
KOKODA TRACK CAMPAIGN
In 1942, WWII was on Australia’s doorstep for the very first time with the Japanese invasion of Rabaul in Papua New Guinea. With most of our forces tied up in the Middle East, a group of young, inexperienced militia soldiers were tasked with intercepting the Japanese before they took Port Moresby from the north.
The average age of soldiers was early twenties with many teenagers – they were outgunned, undertrained and ill-equipped. Victory looked unlikely if not for the courage of the diggers and their indispensable alliance with PNG nationals, fondly named the Fuzzy Wuzzy Angels. Over four arduous months, the Fuzzy Wuzzy Angels helped secure an Australian victory by forming a human supply chain along the Kokoda Track, moving food, ammunition and wounded soldiers to and from the front line.
By January 22nd 1943, the diggers had successfully warded off the advance, with less than 15% of the 20,000 strong Japanese force returning to their homeland. 2,339 Aussie diggers died honourably, and 3,632 were wounded in battle.
Since then, Kokoda has resonated with many Australians, and to replicate the diggers’ journey has become an essential rite of passage.
The trek is physically, mentally and spiritually demanding. It remains a powerful reminder of Australia and PNG’s shared history, teaching Australians young and old the true meaning of courage, endurance, mateship and sacrifice. Importantly, it reaffirms our responsibility to the descendants of the PNG nationals who played such a pivotal and crucial role in the Kokoda Campaign.
The first main troops on the track were that of the 39th battalion, they were mostly young, undertrained and ill equipped. Victory looked unlikely if not for the courage of the diggers and their indispensable alliance with PNG nationals, fondly named the Fuzzy Wuzzy Angels.
Over four arduous months, the Fuzzy Wuzzy Angels helped secure an Australian victory by forming a human supply chain along the Kokoda Track, moving food, ammunition and wounded soldiers to and from the front line.
By January 22nd 1943, the Diggers had successfully warded off the advance, with less than 10% of the 14,000 strong Japanese force returning to their homeland. 491 Diggers died in action, 67 died of wounds, 66 missing presumed killed, 67 died if wounds & 1023 wounded in battle.
Since then, Kokoda has resonated with many Australians, and to replicate the Diggers’ journey has become an essential rite of passage.
The trek is physically, mentally and spiritually tough. It remains a powerful reminder of Australia and PNG’s shared history, teaching Australians young and old the true meaning of courage, endurance, mateship and sacrifice. Importantly, it reaffirms our responsibility to the descendants of the PNG nationals who played such a crucial role in the Kokoda Campaign.
The Kokoda Track is a mostly very narrow path that links Owers Corner, approximately 40km northeast of Port Moresby and the small village of Wairopi, on the northern side of the Owen Stanley mountain range. From Wairopi, a crossing point on the Kumusi River, the Track was connected to the settlements of Buna, Gona and Sanananda on the north coast.
The Japanese having had their initial effort to capture Port Moresby by a seaborne evasion disrupted by their defeat at the battle of the Coral Sea, saw the Kokoda Track as a way by which to advance on it overland. Soldiers of the South Seas Detachment began landing at Gona on 21 July 1942, intending initially just to test the feasibility of the Kokoda Trail as a route of advance, but a full-scale offensive soon developed. The first fighting occurred between elements of the Papuan Infantry Battalion and the 39th Australian Infantry Battalion at Awala on 23 July. The Australian force was unable to hold back the Japanese, they were poorly equipped, had not yet developed effective jungle warfare tactics, and were fighting at the end of a very long and difficult supply line. A number of desperate delaying actions were fought as the Australians withdrew along the Track. They finally stopped on 17 September at Imita Ridge, the last natural obstacle along the Track, a mere 8km from the junction with the road to Port Moresby. The Japanese held the opposite ridge, 6km in the distant at Ioribaiwa, which was to be their final advance.
The tactical situation, however, had now swung in favour of the Australians. Their artillery at Owers Corner was now in range and their supplies could be trucked most of the way forward; whereas Japanese supplies had to be carried all the way from the north coast. As a result of severe losses suffered by the Japanese at the Guadalcanal following the American landing there, the South Seas Detachment was ordered to withdraw to the north coast of Papua and establish a defensive position there.
Australian troops of the 25th Brigade began to edge forward from Imita Ridge on 23 September; the Japanese withdrew from Ioribaiwa the next day. In the course of their retreat the Japanese fought delaying actions every bit as determined as those of the Australians. Several difficult and costly battles were fought before the 16th and 25th Brigades crossed the Kumusi at Wairopi in mid-November heading for even more bitter fighting around the Japanese beachheads at Gona, Buna and Sanananda.
The Kokoda Track fighting was some of the most desperate and vicious encountered by Australian troops in the Second World War. Although the successful capture of Port Moresby was never going to be precursor to an invasion of Australia, victory on the Kokoda Trail did ensure that Allied bases in northern Australia, vital in the coming counter-offensive against the Japanese, would not be seriously threatened by air attack. Approximately 625 Australians were killed along the Kokoda Trail and over 1,600 were wounded. Casualties due to sickness exceeded 4,000.
"Kokoda Trail" and "Kokoda Track" have been used interchangeably since the Second World War and the former was adopted by the Battles Nomenclature Committee as the official British Commonwealth battle honour in October 1957.
CAMPAIGNS
See below the significant dates and sites notable for Australian's Kokoda campaign. Click 'Read More' to learn about this particular event.

MAROUBRA FORCE START THE TREK - 07 July 1942
On 20 June, 1942 on the command of the Supreme Allied Commander in the Pacific campaign (General Douglas McArthur), General Blamey (Commander of the Australian Army) gave orders to General Basil Morris (Commander Allied forces in PNG) to take action.

‘B’ COMPANY OF THE 39TH BATTALION ARRIVE AT KOKODA- 14 July 1942
B Company arrived in Kokoda in fairly good condition; however, were tremendously exhausted from the seven-day trek across the jungle.

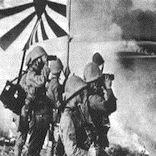
THE JAPANESE LAND AT BUNA-GON-SANANANDA BEACHHEADS- 21 July 1942
On the 20th of July 1942, Simpson Harbour in Rabaul was alive with action. Two high-speed freighters (Ryoyo Maru and the Ayatosan Maru) were ready to depart with an invasion force of soldiers and supplies. At 8 pm they departed in convoy with a protection party of two Navy cruisers and two destroyers.

AUSTRALIANS AND P.I.B. CONFRONT THE JAPANESE- 23 July 1942
The first battle with the Japanese near Kokoda occurred at Awala on 23 July 1942. A small force from the Papuan Infantry Battalion, under the command of Major William Watson, (AIF) made with the Japanese.
FIRST BATTLE FOR KOKODA- 28 July 1942
On 23 July Lieutenant Colonel William Owen, commander of the 39th Battalion was flown to Kokoda to take command of B Company in put in place their defence.
SECOND BATTLE FOR KOKODA-08 August 1942
In the second week of August 1942 the 39th Battalion strengthened all its Company’s in the locality of Deniki. The Australian force now consisted of 33 officers and 443 other ranks of the 39th Battalion; eight Australia...

BATTLE FOR DENIKI- 12 August 1942
With the recapture of Kokoda highly unlikely, Maroubra Force established a defensive position back at Deniki.
Deniki is perched high on the side of a valley overlooking Kokoda and the ...

BATTLE FOR ISURAVA- 26 August 1942
On the 26th August 1942, the Japanese moved forward from Deniki, an assembly of approximately two and a half thousand soldiers, against the 39th Battalion, now under the command of highly respected Lieutenant Colonel Ra...

AUSTRALIAN WITHDRAWAL TO EORA CREEK- 31 August 1942
On the 31 August 1942, the Australian forces withdrew from the Alola area and positioned on the south side of the village of Eora Creek.
Lieutenant Colonel Key, who was the Commanding ...

AUSTRALIAN WITHDRAWAL TO TEMPLETONS CROSSING- 02 September 1942
Brigadier Potts’s Brigade’s was severely depleted. They had been in constant fighting for nearly a week and the fighting so severe that they were unable to even brew a mug of tea or have a meal. Without shelter and slee...

AUSTRALIAN WITHDRAWAL TO MYOLA- 4 September 1942
Myola is an extinct volcanic crater deep in the jungle a few hours from Mount Bellamy and in the thick of the Owen Stanley Ranges. It is a few kilometers east of the main Kokoda Track and consisting of two dry lake beds...

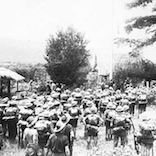
THE 39th BATTALION PARADE AT MENARI- 5 September 1942
The village of Menari is located in the shadow of Brigade Hill approximately three hours walk south.
After the withdrawal of Australian troops across the Kokoda Track, the Australian c...
KAGI TO MISSION RIDGE- 6 September 1942
By the time the Australians reached the Kagi area, the three AIF battalions of the 21st Brigade were able to fight together for the first time. After meeting up at Kagi the 2/14th and 2/16th took up defensive positions ...

BATTLE OF BRIGADE HILL- 08 September 1942
Originally known as Efogi Ridge, Brigade Hill was one of the most horrific battles of the campaign. It could be said that Brigade Hill is Australia’s Gallipoli.

AUSTRALIAN WITHDRAWAL TO NAURO- 10 September 1942
With the failure of all attempts to remove the Japanese from the track at Brigade Hill and the loss of communications with Brigadier Potts, Lieutenant Colonel Caro, Commanding Officer of the 2/16th Battalion took comman...

BATTLE OF IORIBAIWA- 11 September 1942
After the disaster at Brigade Hill, the Australians on the track once again undertook tactics of ambush, fight, stall, withdraw. With their rear guard being harassed by the Japanese, the Australian forces fell back o...

WITHDRAWAL TO IMITA RIDGE- 16 September 1942
On the 16th of September Brigadier Ken Ether requested permission from his Divisional Commander – Major General Arthur “Tubby” Allen to withdrawal to the next ridge back towards Port Moresby, Imita Ridge. – the last ...

AUSTRALIAN ADVANCE BEGINS- 27 September 1942
The Australian advance from Imita was initiated by the 25th Brigade under the command of Brigadier Ken Eather. 28th September 1942 the 25th Brigade moved forward from Imita Ridge to find the Japanese had withdrawn from ...
JAPANESE DELAYING ACTION AT MT. BELLAMY- 11 October 1942
The main Japanese force continued to retreat towards Templeton’s Crossing. In an effort to slow the pursuit and to enable some rear guard defence, General Horri raised a new unit from within his forces. This unit was...

BATTLE FOR TEMPLETONS CROSSING-16 October 1942
The Stanley Detachment’s delaying tactics proved good, by the time they had retreated to Templeton’s Crossing their defensive position at Templeton’s held approximately eight hundred men and 4 mountain guns.

BATTLE FOR EORA CREEK- 22 October 1942
The Australian successes against the Stanley Detachment and then again at Templeton’s crossing were severe delays in the Japanese defensive plans. Within a week General Horri had lost the ground the Stanley Detachmen...
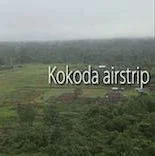
AUSTRALIANS RE-OCCUPY KOKODA- 03 November 1942
The Japanese were badly crushed at Eora Creek and they retreated in a disorderly state. They made no attempt to defend or hold the Kokoda village or airstrip. 02nd of November 1942 members of the 2/31st Battalion entere...